Windows Home Server’s default networking setup
creates a basic configuration that should work without a hitch on most
home networks. However, you should know about a few small tweaks that
can make Windows Home Server a bit easier to work with and that are
required for certain features to work properly. For example, setting up
remote access to the Windows Home Server machine is much easier if you
give the computer a static Internet Protocol (IP) address. These next few sections take you through this and other network modifications.
Do You Need to Change the Windows Home Server Workgroup Name?
It used to be the case that home
networking worked best when all the computers on the network used the
same workgroup name. By default, Windows Home Server installs with the
name WORKGROUP, which is also the default workgroup name used by Windows
7, Windows Vista, and Windows XP Professional. Therefore, if you’re
using any of those operating systems and you’ve set up your network
using the default settings, all your machines should reside in the
WORKGROUP group.
However, if your client
machines are using some other workgroup name, you shouldn’t need to
modify the Windows Home Server workgroup name to match, because the
client PCs should still see the Windows Home Server machine.
That’s a good thing,
because Windows Home Server 2011 actually locks the workgroup name, and
you can’t change it. Or, more accurately, you can
change it, but only after running through a fairly convoluted and
time-consuming process that involves disabling and later enabling the
services that prevent you from changing the workgroup name. In my own
testing, the process works, but it also breaks the local Dashboard on
the server, so in my view it’s not worth the hassle.
Configuring Windows Home Server with a Static IP Address
Every computer on your network requires a unique designation so that packets can be routed to the correct location when information is transferred across the network. In a default Microsoft peer-to-peer network, the network protocol that handles these transfers is Transmission Control Protocol/Internet Protocol (TCP/IP), and the unique designation assigned to each computer is the IP address.
By default, Windows Home Server obtains its IP address via Dynamic Host Configuration Protocol (DHCP).
This requires a server, and in the vast majority of home broadband
networks, that server is the router or wireless access point. (If you
have no DHCP server on your network, you can convert Windows Home Server into one; see the next section.) To
find out the current IP address of the Windows Home Server machine, log
on to the server and then use either of the following methods:
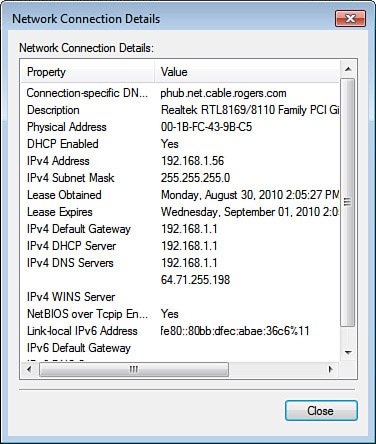
- Log on to the server, click Start, type network, and then click View Network Connections to open the Network Connections window. Double-click the local area network (LAN) icon (which is usually named Local Area Connection), and then click Details. As shown in Figure 1, the IP Address value appears in the Network Connection Details list as the IPv4 value.
- Select Start, All Programs, Accessories, Command Prompt, type ipconfig /all, and press Enter.
The DHCP server offers each
client a lease on the IP address, and in most cases that lease expires
after 24 hours. When the expiration time approaches, the client asks for
a new IP address. In small networks, the DHCP server often assigns a
client the same IP address each time, but that’s not guaranteed. A
changing IP address is no big deal for client computers, but it can be a
problem for the Windows Home Server machine. Most importantly, remote
access sessions require that you set up your router to forward remote
requests to the Windows Home Server computer. You do that by specifying
the server’s IP address, so if that address changes, the remote access
sessions won’t work.
Therefore, it’s a good idea to assign a static IP address to your Windows Home Server machine. Here’s how:1. | Log on to Windows Home Server either locally or by using a Remote Desktop connection.
|
2. | Select Start, type network, and then click View Network Connections to open the Network Connections window.
Tip
You can also click the network icon in the notification area, click Open Network and Sharing Center, and then click Change Adapter Settings.
|
3. | Double-click the icon for the connection to your LAN. The connection’s Status dialog box appears.
|
4. | Click Details.
|
5. | Make a note of the following values (refer to Figure 1):
Subnet Mask—On home networks, this is usually 255.255.255.0. Default Gateway—On home networks, this is the IP address of your router or access point. DNS Servers—These are usually the IP address of your router and access point, as well as the IP address of the main Domain Name System server that your Internet Service Provider (ISP) uses.
|
6. | Click Close to return to the Status dialog box.
|
7. | Click Properties. The connection’s property sheet appears.
|
8. | On the General tab, click Internet Protocol Version 4 (TCP/IPv4), and then click Properties.
|
9. | Click the Use the Following IP Address option.
|
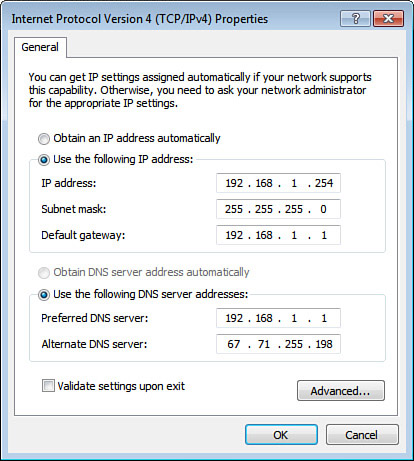
10. | Type
the IP address you want to use. Be sure to use an address that won’t
conflict with the other DHCP clients on your network. A good idea is to
use the highest possible address, such as 192.168.1.254 (if your network
uses 192.168.1.* addresses) or 192.168.0.254 (if your network uses
192.168.0.* addresses).
|
11. | Type the IP addresses for the Subnet Mask (Windows Home Server should fill this in automatically), Default Gateway, Preferred DNS Server, and Alternate DNS Server that you noted in step 5. Figure 2 shows a completed version of the dialog box.
|
12. | Click
OK to return to the connection’s property sheet. If at this point you
lose your Remote Desktop connection (because you changed the server’s IP
address), you can skip the next two steps.
|
13. | Click Close to return to the Status dialog box.
|
14. | Click Close.
|
Tip
When
you specify a static IP address, you must also specify a static domain
name system (DNS) server address used by your ISP. This shouldn’t cause a
problem with most ISPs because their DNS server addresses are constant.
However, you might have trouble if your ISP changes its DNS settings.
You can work around this problem by first returning Windows Home Server
to getting its IP address dynamically. Then log in to your router and
look for an option that enables you to map a static IP address to the
server’s Media Access Control (MAC; see the next Note) address. This
means that each time the server requests a new DHCP lease, the router
supplies the server the same IP address. Note that not all broadband
routers offer this option.
Note
To find out your
server’s MAC address, open the Network Connections window, right-click
the LAN icon, click Status, and then click Details. (Alternatively,
select Start, Command Prompt, type ipconfig /all, and press Enter.) The MAC address is given by the Physical Address value.
Setting Up Windows Home Server as a DHCP Server
If your home network
doesn’t have a device that acts as a DHCP server, or if you want more
control over DHCP on your network, you can convert Windows Home Server
into a DHCP server.
Caution
Windows Home Server’s DHCP
Server service might not work if you have another DHCP server on the
network. If you have a router or access point that currently has DHCP
enabled, you might have to first disable DHCP on that device.
To set up Windows Home Server as
a DHCP server, you must add the DHCP Server role. This role comes with
Windows Home Server, but it’s not added by default. Assuming you’ve
already set up your Windows Home Server with a static IP address, as
described earlier, follow these steps to add the DHCP Server role:
1. | Click the Server Manager icon that appears to the right of the Start button. Windows Home Server opens the Server Manager.
|
2. | Click Roles.
|
3. | Click Add Roles. Server Manager launches the Add Roles Wizard.
|
4. | Click Next.
|
5. | Click to activate the DHCP Server check box, and then click Next. The wizard displays the DHCP Server dialog box.
|
6. | Click Next. The wizard displays the Select Network Connection Bindings dialog box.
|
7. | Make
sure the check box beside the network connection to which you assigned a
static IP address is activated, and then click Next. The wizard
displays the Specify IPv4 DNS Server Settings dialog box.
|
8. | Use
the Parent Domain text box to type the name of your workgroup, and then
click Next. The wizard displays the Specify IPv4 WINS Server Settings
dialog box.
|
9. | You don’t need a WINS (Windows Internet Name Service) server, so click Next.
|
10. | Click
Next. The wizard displays the Add or Edit DHCP Scopes dialog box. The
scope is the range of IP addresses that the server can dole out to the
clients.
|
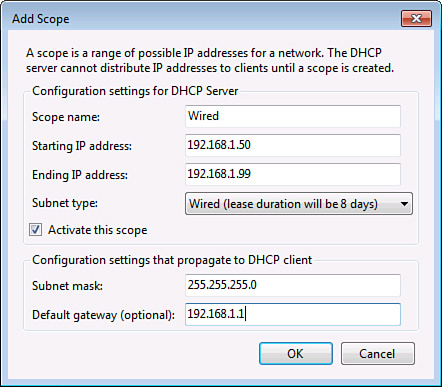
11. | Click Add. The Add Scope dialog box appears.
|
12. | Type a name for the scope.
|
13. | Define the scope range:
Starting IP Address—Type the starting address for the IP address range you want the server to use (for example, 192.168.1.50). Ending IP Address—Type
the ending address for the IP address range you want the server to use
(for example, 192.168.1.99). Make sure this address is higher than the
Starting IP Address value.
|
14. | Use the subnet Type list to select Wired. Figure 3 shows a completed Add Scope dialog box.
|
15. | |
16. | Click Next. The wizard displays the Configure DHCPv6 Stateless Mode dialog box.
|
17. | Activate the Disable DHCPv6 Stateless Mode for This Server option, and then click Next.
|
18. | Click Install. Server Manager installs the DHCP server.
|
19. | Click Close. |